
Learning Solidity is your ticket to building decentralized applications on blockchains like Ethereum. It's a high-level, contract-oriented language designed from the ground up for one thing: creating the self-executing smart contracts that are the engine behind DeFi, NFTs, and so much more.
Why Solidity Is Your Gateway to Web3
Solidity isn't just another language to add to your toolkit; it's the primary language for building on Ethereum, the world's most active and established smart contract platform. Think of it as the framework for building the logic that powers decentralized finance (DeFi), unique digital collectibles (NFTs), and decentralized autonomous organizations (DAOs). The language is intentionally built for security and precision—two non-negotiables when you're handling valuable digital assets on a permanent, unchangeable ledger.
Getting a handle on Solidity means you can stop being a spectator and start building the future of the internet. You'll be writing code that automates complex agreements without a middleman, creating entirely new forms of digital ownership, and contributing to a more open and transparent web. For any developer, that’s an incredibly powerful and in-demand skill to have.
The Heart of Smart Contract Development
Solidity has cemented its place as the top smart contract language for a few key reasons. It was designed specifically to work with the Ethereum Virtual Machine (EVM) and is backed by a massive, well-established community of developers. Its statically-typed nature is a huge plus, as it helps you catch errors early and write more reliable code—which is absolutely critical when deploying secure smart contracts.
Solidity's real power is its ability to turn complex financial or legal agreements into code that runs automatically and can never be changed. This is the very essence of the "code is law" principle in Web3.
This level of automation and control unlocks a world of possibilities. For example, you could create things like:
- Decentralized Exchanges (DEXs): Platforms that let people trade digital assets directly, without a central company taking a cut.
- NFT Marketplaces: Venues for creating, buying, and selling one-of-a-kind digital items.
- Automated Lending Protocols: Systems where loans and interest are managed entirely by code, not by a bank.
As the appetite for these applications continues to explode, so does the demand for developers who can build them. The skills you'll gain put you in a prime position to build your own projects or land one of the many high-paying blockchain development jobs available. Simply put, getting good at Solidity is a direct investment in a career built for the future.
Setting Up Your Development Environment
Before you write a single line of Solidity, you need to get your workspace in order. A well-configured development environment is the bedrock of your learning journey; it can be the difference between a smooth, exciting process and a wall of frustration. We'll look at the best tools for the job, from simple browser-based options to a full-blown local setup.
The fastest way to get your hands dirty is with an online Integrated Development Environment (IDE) like Remix. I always recommend beginners start here. It runs completely in your browser, so there’s zero installation or complicated setup. You can jump straight into writing, compiling, and deploying your first smart contracts.
Here's a look at the default Remix interface. You've got your file explorer on the left, the main code editor in the middle, and all your compiling and deployment tools on the right.
The beauty of Remix is its accessibility. It completely removes the initial barrier to entry, letting you focus on the code itself. Everything you need to write, test, and debug is right there in one tab.
Moving to a Local Setup
Remix is fantastic for learning and quick prototypes, but once you get serious, you’ll want a local environment. A local setup gives you far more power and control, letting you use advanced testing frameworks and manage complex, multi-file projects—the kind you'll find in the real world.
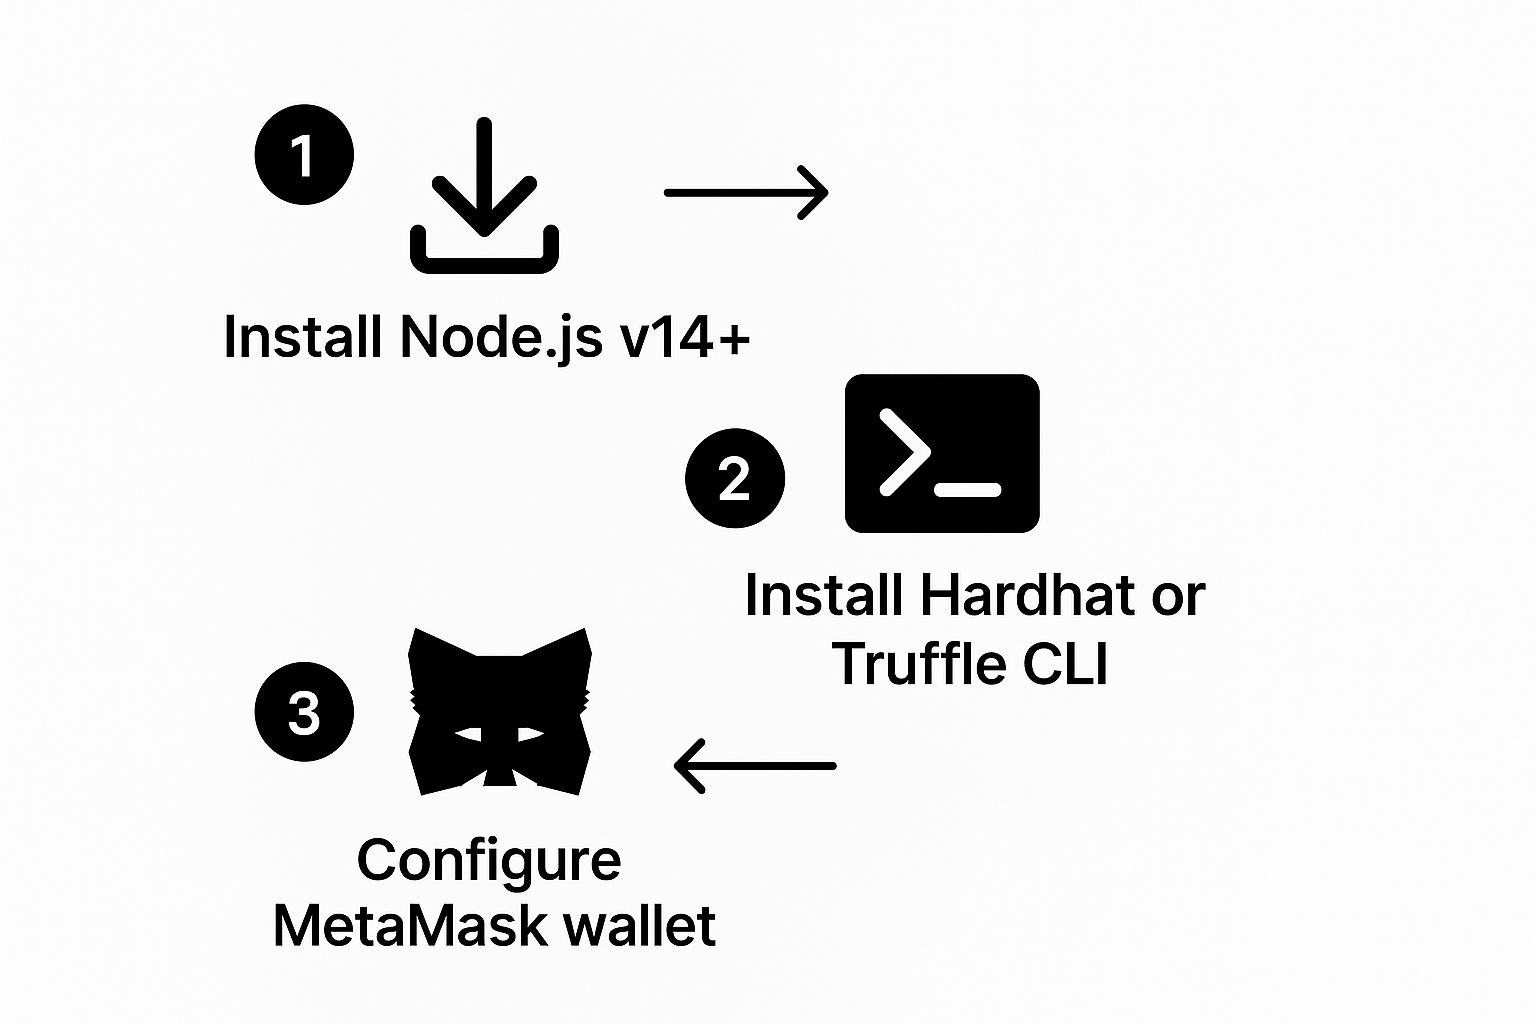
Putting this together involves installing a few core components that work in tandem to create a professional workflow.
The core of a local setup starts with Node.js, which powers your tooling. From there, you'll add a development framework like Hardhat or Truffle, and then a browser wallet like MetaMask to actually interact with your deployed contracts.
When it comes to frameworks, two names dominate the space: Hardhat and Truffle. Both give you a complete toolkit for compiling, testing, and deploying contracts.
- Hardhat: This is my go-to recommendation for new developers. It's known for its flexibility and amazing debugging features, like detailed error messages (stack traces) and the ability to use
console.logright inside your smart contracts. It also spins up a local Ethereum network for you right out of the box. - Truffle: As one of the original development suites, Truffle is a long-standing community favorite. It’s part of a larger ecosystem that includes Ganache (a local blockchain GUI) and Drizzle (a front-end library), offering a very structured approach to project organization.
While you can't go wrong with either, Hardhat's modern feel and developer-friendly experience give it the edge for most people starting today.
Installing and Configuring Your Tools
Ready to go local? The first step is installing Node.js (I recommend version 16 or higher) and its package manager, npm. With that done, you can install a framework from your command line. For Hardhat, the command is npm install --save-dev hardhat.
Next, navigate to your project directory and run npx hardhat. This simple command kicks off an interactive guide that sets up a new project for you, creating all the necessary configuration files, contract and test folders, and some helpful example scripts.
Your local setup is a self-contained universe, but you still need to connect to a "blockchain." For development, tools like Hardhat and Ganache simulate this right on your machine. When you're ready to go live, you'll connect to a public testnet (like Sepolia) using a node provider like Infura or Alchemy.
The final piece of the puzzle is a browser wallet like MetaMask. Think of it as the bridge between your web browser and the Ethereum blockchain. You’ll use it to manage test accounts, sign transactions, and interact with your contracts on both your local network and public testnets. Getting MetaMask configured to talk to your local Hardhat network is the last step in creating a powerful, seamless development loop.
Getting to Grips with Core Solidity Syntax and Concepts
Alright, with your development environment fired up, it’s time to actually write some code. Learning any language is about mastering its grammar and vocabulary. For anyone looking to learn the Solidity programming language, that means getting a feel for how contracts manage data, run logic, and talk to the outside world.
If you’ve ever worked with JavaScript or C++, you’ll notice some familiar syntax in Solidity. But don't get too comfortable. Its design is tailored for the high-stakes environment of a blockchain, where every line of code is immutable and often controls real financial assets.
State Variables and Data Types: The Contract's Memory
Every smart contract revolves around its state—the data permanently etched onto the blockchain. In Solidity, we use state variables to hold this data. You declare them right inside the contract, but outside of any functions.
Think of state variables as the permanent memory of your application. They define the very structure of the data your contract is built to handle. Since Solidity is a statically-typed language, you have to be explicit about what kind of data each variable will hold.
You'll be working with these common data types day in and day out:
uint: An unsigned integer for non-negative numbers. You'll seeuint256everywhere, as it's the native size for the EVM and perfect for token balances.int: A signed integer, for when you need to represent positive and negative values.address: This is a core one. It's a 20-byte value that holds an Ethereum account address, essential for tracking ownership or sending crypto.bool: The classictrueorfalse, perfect for simple flags and checks.string: A sequence of characters for storing text.
Solidity also gives you powerful tools for organizing more complex data. Two of the most important are structs and mappings.
A struct lets you define your own custom data types by bundling other variables together. For example, you could create a Voter struct that contains their address and a boolean for whether they've voted. Mappings are the Solidity equivalent of a hash table or dictionary, creating simple key-value lookups. A classic pattern is mapping(address => uint256), which is a perfect way to track token balances for every user.
The Anatomy of a Solidity Function
Functions are where the magic happens. They house all the logic that reads from or writes to the contract's state. When you write a function, you must define its visibility, which is a critical security setting that dictates who can call it.
Here’s a quick rundown of the visibility options:
public: Anyone can call it, from outside the blockchain (like from a user's wallet) or from other functions inside the contract.external: Can only be called from outside the contract. This is often a bit more gas-efficient thanpublicfor functions that take in external data.internal: Only callable from within the contract itself or from contracts that inherit from it.private: The most restrictive—it can only be called from other functions inside the very same contract.
You also have to tell Solidity if a function is going to change the state. If a function only reads data, you mark it as view. If it doesn't even need to read state data, you mark it as pure. The best part? Calling view and pure functions from outside the blockchain doesn't cost any gas.
A fantastic habit to get into early is to make your functions as restrictive as possible by default. Start with
privateorinternal, and only open them up topublicorexternalwhen you have a clear reason. This one simple habit can save you from a world of security headaches down the road.
Let's Write Your First Simple Contract
Okay, let's pull these pieces together and build something. This SimpleStorage contract does exactly what its name implies: it lets anyone store a number and anyone else retrieve it. It's the "Hello, World!" of smart contracts.
// Specifies the license and compiler version
// SPDX-License-Identifier: MIT
pragma solidity ^0.8.20;
contract SimpleStorage {
// A state variable to store a number
uint256 public myNumber;
// A function to change the number
function store(uint256 _newNumber) public {
    myNumber = _newNumber;
}
// A function to view the number
// Note: Solidity automatically creates a getter for public state variables,
// so this function is technically redundant but good for learning.
function retrieve() public view returns (uint256) {
    return myNumber;
}
}
In this tiny contract, myNumber is our state variable. The store function is public, allowing anyone to call it and pass in a _newNumber to update the state. The retrieve function is marked as view since it only reads the myNumber value without changing anything.
Handling Errors and Conditions Gracefully
Things don't always go as planned. Smart contracts need to be able to validate inputs and check conditions before they proceed. Solidity gives us three main tools for this: require(), assert(), and revert().
require(condition, "Error message"): This is your workhorse for error handling. Use it to check inputs from users or to validate conditions from other contracts. If theconditionis false, the transaction stops, reverts, and returns the unused gas to the caller.assert(condition): This one is different. It’s meant for checking for internal errors or "invariants"—things that should never be false if your code is working correctly. A failedassertusually means you have a serious bug.revert("Error message"): This is for more complex logic. You might have anif-elseblock where one path needs to stop execution. In that case, you just callrevert().
Getting comfortable with these is non-negotiable for writing safe code. You'll use require() constantly to make sure a user is who they say they are (require(msg.sender == owner)) or has enough funds to perform an action.
Building and Testing Your First Smart Contract
Alright, you've got a handle on the core syntax. Now for the fun part: putting it all together to build something real. Theory is one thing, but nothing makes the concepts click like writing a complete, functional smart contract. We're going to move beyond basic examples and create something with a genuine purpose.
For this guide, we’ll build a simple decentralized crowdfunding platform. It's a classic for a reason. This project forces you to grapple with several key Solidity concepts at once: managing state, handling real Ether, and enforcing rules strictly through code.
The idea is simple. A project owner sets a funding goal and a deadline. Anyone can contribute Ether. If the goal is hit before the deadline, the owner gets the funds. If not, everyone gets their money back.
Crafting a Simple Crowdfunding Contract
First things first, let's sketch out the contract's structure. We need a way to track who owns the project, the funding target, the deadline, and how much has been raised so far. We also need to remember who contributed what, which is a perfect job for a mapping.
Here’s what that initial skeleton looks like:
// SPDX-License-Identifier: MIT
pragma solidity ^0.8.20;
contract CrowdFund {
address public owner;
uint256 public fundingGoal;
uint256 public deadline;
uint256 public amountRaised;
mapping(address => uint256) public contributions;
// We will add functions and events here
}
With the variables defined, we can start adding the logic. The constructor is the natural place to set the initial values—like the funding goal and duration—right when the contract is deployed. Next, we'll need a function that can actually accept contributions. This requires a special payable function, which is how Solidity handles incoming Ether.
Finally, we'll build functions for the owner to withdraw the funds (if the campaign succeeds) and for contributors to get refunds (if it fails). Each of these will be guarded by require() statements to make sure the rules are followed, like checking if the deadline has passed or if the funding goal was actually met.
The Critical Role of Smart Contract Testing
In regular software development, a bug is usually a fixable problem. In the world of smart contracts, it can be a disaster. Code on the blockchain is immutable and often controls real financial assets. That’s why testing isn't just a good idea; it's an absolute necessity.
Tools like Hardhat come with a fantastic testing setup right out of the box, typically using Mocha to organize tests and Chai to check the results. This combination lets you write tests that are easy to read and that perfectly mimic how users would interact with your contract.
Adopt this mindset: "If it isn't tested, it's broken." Every function, every condition, every possible outcome—it all needs a test case. You have to verify how your code behaves when things go right and when they go wrong.
For our CrowdFund contract, a good test suite would answer questions like:
- Does the contract properly record new contributions?
- Does it block contributions sent after the deadline?
- Can the owner only withdraw funds if the goal is met and the deadline has passed?
- Can contributors successfully claim a refund if the campaign fails?
- Does it correctly block withdrawals or refunds when conditions aren't met?
Testing is a deep discipline, and if you want to go further, exploring general software testing best practices can provide a solid foundation that applies well beyond just smart contracts.
Writing Your First Unit Test
So, what does a test actually look like? Here’s a simple example for our CrowdFund contract using Hardhat and Chai. This test just checks if the constructor did its job correctly when we first deployed the contract.
const { expect } = require("chai");
const { ethers } = require("hardhat");
describe("CrowdFund", function () {
it("Should set the owner and funding goal correctly", async function () {
const [owner] = await ethers.getSigners();
const fundingGoal = ethers.parseEther("10"); // Goal of 10 ETH
const CrowdFund = await ethers.getContractFactory("CrowdFund");
// Deploy with a goal of 10 ETH and a 30-day deadline
const crowdFund = await CrowdFund.deploy(fundingGoal, 30 * 24 * 60 * 60);
expect(await crowdFund.owner()).to.equal(owner.address);
expect(await crowdFund.fundingGoal()).to.equal(fundingGoal);
});
});
This script fires up our contract on a local test network and then uses expect to confirm that the owner and fundingGoal variables are what we told them to be. It's a small first step, but it's the beginning of a robust suite that builds confidence in your code.
This level of rigor is precisely why skilled Solidity developers are so sought after. The market for Solidity development services was valued at USD 66.8 million in 2024 and is projected to climb to USD 173 million by 2031. This explosive growth is fueled by the 4,000+ active dApps on Ethereum and increasing enterprise adoption.
Getting this right separates the pros from the amateurs, and it’s a non-negotiable skill for most Web3 engineering job roles.
Gas, Security, and Getting Your Contract Live
Alright, you've written a smart contract that works. That's a huge milestone. But getting code to function is just the first part of the job. Now we get into the stuff that separates the hobbyists from the pros: making your contract efficient and bulletproof.
A contract that costs a fortune to run is dead on arrival, and one with a security flaw is a ticking time bomb. This is where we dive into the nitty-gritty of gas optimization and defensive coding—the skills that truly define an expert Solidity developer.
What's the Deal with Ethereum Gas?
Every single thing that happens on the Ethereum blockchain—from sending a token to executing a complex trade—has a computational cost. Gas is simply the unit we use to measure that cost. Think of it like electricity for the network; every operation consumes a certain amount.
Each instruction in your Solidity code has a predetermined gas cost. A simple math operation (+) is dirt cheap, but writing a new piece of data to the blockchain's storage is one of the most expensive things you can do. The final transaction fee you pay is a simple formula: the total gas your transaction used multiplied by the current gas price, which swings up and down based on network congestion.
This becomes incredibly important when you're dealing with anything that involves multiple transactions, like with ERC-20 tokens. You'll often see discussions about increased blockchain fees for Ethereum ERC-20 transactions, and it's almost always tied back to inefficient code. If your contract is a gas-guzzler, you’re pricing out your users.
Here's a critical mindset shift: you're not just writing software. You're writing software that costs real money to execute. Gas optimization isn't a final polish; it's a foundational part of your design process from line one.
So, how do you write lean, gas-friendly code? Start here:
- Be Stingy with Storage: Reading from storage costs gas, but writing to it is an order of magnitude more expensive. If you don't absolutely have to change a state variable, don't.
- Use
memoryandcalldata: For data that's just passing through—like function arguments or temporary variables—usememoryorcalldatainstead ofstorage. This keeps the data off the permanent ledger and saves a ton of gas. - Watch Your Loops: A loop that can run an unpredictable number of times is a gas bomb waiting to go off. Keep your loops tight and, whenever possible, process data in predictable batches.
The Most Common Security Traps and How to Sidestep Them
Smart contract security isn't just a best practice; it's a high-stakes necessity. One little vulnerability can mean millions of dollars in lost funds. Your job is to build a fortress. Here are the classic attacks you absolutely have to defend against.
1. Reentrancy Attacks
This is the big one, the legendary vulnerability behind the infamous DAO hack. It happens when a malicious contract calls back into your function before it has finished running. If you're not careful, the attacker can just keep calling your withdraw function, draining funds over and over in a single transaction.
- The Defense: The Checks-Effects-Interactions pattern is your best friend.
- Checks: First, perform all your validation (
requirestatements). - Effects: Second, update all your state variables (e.g., reduce the user's balance).
- Interactions: Only then, after your internal state is secure, do you interact with other contracts (like sending the Ether).
- Checks: First, perform all your validation (
2. Integer Overflow and Underflow
This is a classic programming bug where a math operation creates a number bigger or smaller than the data type can hold. For instance, a uint8 can only hold values from 0 to 255. If you have a uint8 set to 255 and you add 1, it doesn't become 256—it "wraps around" back to 0. A hacker could exploit this to get a massive token balance, for example.
- The Defense: Use a modern compiler. Since Solidity version 0.8.0, the compiler automatically builds in overflow and underflow checks. If one happens, the transaction just reverts. This is a huge safety net and a primary reason you should never use an old compiler version. In the old days, we had to rely on libraries like OpenZeppelin's
SafeMathto handle this manually.
3. Weak Access Control
It sounds simple, but you'd be shocked how often this mistake is made. If you don't properly gate who can call your contract's most powerful functions, you've left the front door wide open. Any function that moves funds or changes critical settings must be locked down.
- The Defense: Implement an
Ownablepattern. You create a state variable calledownerand then a modifier (a reusable code snippet) likeonlyOwnerthat you can attach to any function. This ensures that only the address stored inownercan ever call it.
Understanding these details is why the market is so hot for skilled Solidity devs. With DeFi and NFTs booming, the demand for people who get security is off the charts. The average salary for a Solidity developer in the US hovers around $110,000, but experts who have a deep grasp of security can command up to $225,000 annually.
Final Step: Deploying to a Public Testnet
Once your code is tested and hardened, it's time to see how it behaves in the wild. But you never, ever go straight to the main Ethereum network. First, you deploy to a testnet.
Testnets like Sepolia are full-fledged public blockchains that work just like the real thing, with one key difference: the Ether on them is completely worthless. This gives you a perfect sandbox to deploy your contract and interact with it in a live environment without risking a single cent.
Using a framework like Hardhat, you'll write a simple deployment script. This script will connect to the testnet through a node provider (like Infura or Alchemy), use your private key to sign and pay for the transaction, and push your compiled code onto the blockchain for everyone to see. It’s the final dress rehearsal before your contract makes its mainnet debut.
Your Top Solidity Questions, Answered
As you dive into Solidity, you're bound to have questions. Everyone does. Here are some of the most common ones I hear from developers just starting out, along with some straight-to-the-point answers to get you on the right track.
Do I Need to Be a Coding Genius to Start?
Not at all, but it definitely helps to know your way around some code first. You'll have a much easier time if you've already played with a language like JavaScript, Python, or C++.
If you understand the basics—things like variables, functions, and the core ideas of object-oriented programming (OOP)—you're in a great spot. That foundation lets you focus on what makes Solidity unique, rather than learning to code from scratch.
How Long Until I'm Actually Good at This?
Ah, the classic "it depends" question. And it really does. Your background and the hours you put in are the biggest factors. If you're already a seasoned developer, you could get a solid handle on the basics in a few weeks of dedicated work.
But let's be realistic. To get to a point where you're truly job-ready—meaning you understand security, can write solid tests, and know how to deploy contracts properly—you should budget for 3 to 6 months. That means consistent, focused learning and, most importantly, building things.
The real secret is to stop just watching tutorials and start building. The moment you shift from simply understanding syntax to actually solving problems with your own code, that's when the knowledge truly sticks.
What are the Classic Rookie Mistakes I Should Avoid?
I see beginners make the same critical mistakes all the time. The big three are: completely underestimating security, writing clunky, gas-guzzling code, and thinking testing is optional.
A lot of new developers treat Solidity like any other backend language, but that's a dangerous mindset. You have to remember: smart contracts are permanent and they often control real money.
- Security Blind Spots: Forgetting about common vulnerabilities like reentrancy attacks is a huge one. It's a rite of passage, but a costly one.
- Wasting Gas: Writing functions that are ridiculously expensive to run is another. If your contract costs a fortune to use, no one will use it.
- Skipping Tests: Deploying a contract without a rock-solid test suite is just asking for disaster. You won't find the bugs until it's far too late.
Drill this into your head from day one: security and efficiency are everything in Solidity.
I’ve Got the Basics Down. What’s Next?
Once you feel solid on the fundamentals we've covered, it's time to venture into the deep end. The Web3 space is massive and always evolving. In fact, if you want to see just how fast it's growing, check out these insightful Web3 statistics and growth trends.
Ready to level up your skills? Here’s what you should tackle next:
- Explore Upgradeable Contracts: Get familiar with proxy patterns, like UUPS, so you can build smart contracts that aren't stuck in time.
- Read the Greats: Go on GitHub and dig into the source code of major DeFi protocols like Uniswap or Aave. It’s like a masterclass in professional-grade contract design.
- Think Like a Hacker: Try to break things (ethically, of course). Platforms like OpenZeppelin's Ethernaut have wargames that teach you to spot vulnerabilities by exploiting them.
- Join the Community: Find an open-source Web3 project and start contributing. There is no better way to get real-world, collaborative experience.
Ready to put those new skills to work? Find Web3 is the best place to land your next job in the blockchain industry. We have thousands of roles for engineers, designers, marketers, and more.