How to Deploy a Smart Contract on Ethereum With Hardhat
Set up MetaMask and Sepolia test ETH, compile a contract in Hardhat, write the deployment script and verify the result on Etherscan.
Deploying a smart contract means taking your compiled code and broadcasting it to a network like Ethereum as a transaction. Once that transaction is included in a block, the contract is a permanent public program living at a fixed address, and anyone can call it. This is the point where Solidity source becomes live on-chain logic.
From Code to Chain: How Smart Contract Deployment Works
Deployment is not an upload to a server. It is a transaction that carries your contract's compiled code, and the result is stored and re-executed by nodes across the network. Once it is confirmed, you cannot edit it.
Core Deployment Concepts
Compiling a contract produces two things, and you will handle both:
- Bytecode: the low-level, machine-readable version of your contract, generated when you compile your Solidity. This is the program that is stored on chain and run by the Ethereum Virtual Machine (EVM).
- ABI: the Application Binary Interface, a JSON file describing your contract's functions and their arguments so that other applications and contracts know how to call them. If these terms are new, the Web3 dictionary defines them.
The Role of Gas and Networks
Getting a contract on chain costs a transaction fee, paid in the network's native currency, which is ETH on Ethereum. The fee covers the computation and the storage the deployment uses, so a larger contract costs more than a small one: there is more bytecode to write.
That leads to the first real decision, which network to deploy on. Mainnet costs real money and the result is irreversible. Start on a testnet. Sepolia runs the same software with valueless test funds, so you can deploy, find your mistakes, and deploy again at no cost.
Mainnet vs Testnet Deployment Comparison
| Feature | Testnet (e.g., Sepolia) | Mainnet (Ethereum) |
|---|---|---|
| Cost | Free (uses valueless test ETH) | Real ETH required for gas fees |
| Risk | Zero financial risk | High financial risk; mistakes are permanent and costly |
| Purpose | Development, testing, and debugging | Live, production-ready applications |
| Data | Not permanent; can be reset | Permanent and immutable |
| Security | Lower security, not for real assets | Highest level of security |
A testnet is the sandbox. Mainnet is where the finished contract goes.
Getting Your Deployment Environment Ready
Nearly every modern blockchain development tool runs on Node.js and npm, its package manager. Node.js runs JavaScript outside the browser, which is how a framework like Hardhat works. Install the current release from the official Node.js site; Hardhat 3 requires Node.js v22.13.0 or later, according to its own getting-started documentation.
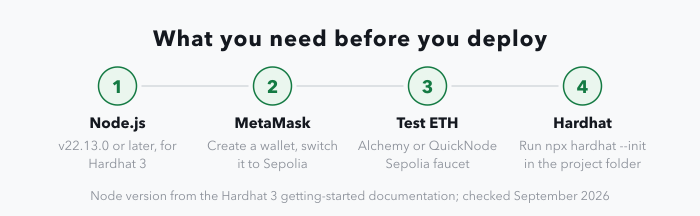
Then open a terminal. node -v and npm -v should both return version numbers.
Getting Your Wallet in Order
Next, a wallet. For development work that usually means MetaMask, which holds funds but is also what signs your transactions and deploys your code.
When you create a new wallet, MetaMask shows you a 12-word secret recovery phrase. That phrase is the master key to the wallet.
Security: never store a secret recovery phrase digitally. Not in email, not in a notes app, not in a screenshot. Write it on paper and keep it somewhere safe. Anyone who has the phrase has the wallet.
MetaMask connects to Ethereum Mainnet by default. Use the network dropdown at the top of the window to switch to Sepolia, the main test network Ethereum developers use today.
Topping Up with Testnet ETH
Every transaction costs gas, including on a testnet, so you need some Sepolia ETH. It has no real-world value and it comes from a service called a faucet. Copy your wallet address out of MetaMask and paste it into one of these:
- Alchemy's Sepolia faucet: requires a free Alchemy account.
- QuickNode's Sepolia faucet: another working option.
The test ETH usually lands in your wallet within a few minutes. That funds the whole deployment process without putting real assets at risk.
Getting Started with a Hardhat Project
Hardhat handles compiling, testing, deploying, and debugging from a single project.
Create a folder for the project, open it in your terminal, and run npx hardhat --init. The command asks a few configuration questions; accepting the defaults initializes the project in the current directory and installs the dependencies it needs.
You end up with a hardhat.config.ts file and a standard layout: contracts/ for Solidity source, test/ for tests, scripts/ for scripts that automate parts of your workflow, and ignition/ for Hardhat Ignition deployment modules.
Writing and Compiling Your First Contract
The sample project ships with an example contract in contracts/, which you can keep or replace. This guide uses a contract called Greeter.sol: it stores a greeting and lets you change it later. That is the blockchain equivalent of "hello world", enough to exercise the mechanics without the complexity.
Compiling converts your Solidity into bytecode, the form the Ethereum Virtual Machine runs, and produces the ABI, the JSON file that tells other applications how to call your functions. You cannot deploy without both.
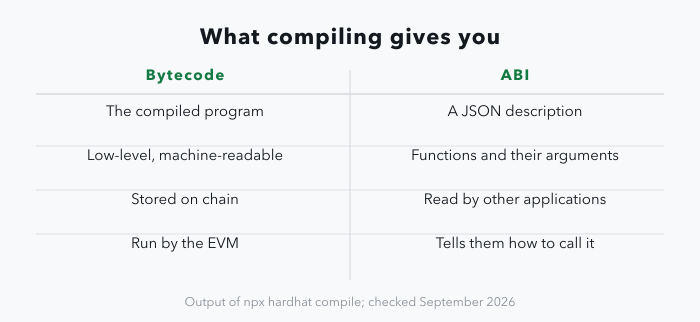
With Greeter.sol saved in contracts/, run npx hardhat compile. Hardhat finds every .sol file in the directory, compiles it, and reports any syntax errors. On success an artifacts/ directory appears holding the bytecode and the ABI, ready to deploy.
Writing an Automated Deployment Script
Deploying by hand is tedious and easy to get wrong. A script makes the process repeatable, which matters most on the one occasion you cannot repeat: a mainnet launch.
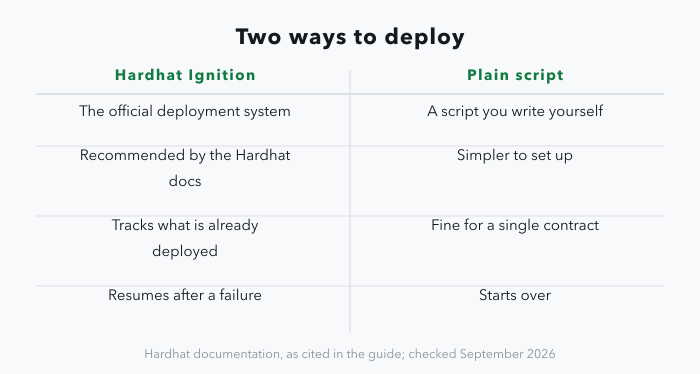
Hardhat offers two routes. Hardhat Ignition is the official deployment system, and the Hardhat documentation recommends it; it tracks what has already been deployed and can resume after a failure instead of starting over. A plain script is simpler and fine for a single contract, and that is what this section builds.
The Anatomy of a Deployment Script
Find the scripts/ directory Hardhat generated and create deploy.ts in it. The script needs to say two things: which contract to deploy, and which account signs the transaction and pays the gas.
The flow is always the same:
- Open a network connection: this also determines the account that pays for the deployment.
- Deploy the contract: this sends the transaction carrying the contract's bytecode.
- Wait for confirmation: the script pauses until the transaction is included in a block.
- Log the new address: print the contract's on-chain address so you know where to find it.
Putting the Code Together
// scripts/deploy.ts
import { network } from "hardhat";

const { ethers, networkName } = await network.create();

console.log(`Deploying Greeter to ${networkName}...`);

const greeter = await ethers.deployContract("Greeter", ["Hello, Find Web3!"]);

console.log("Waiting for the deployment tx to confirm");
await greeter.waitForDeployment();

console.log("Greeter address:", await greeter.getAddress());
ethers.deployContract("Greeter", ["Hello, Find Web3!"]) does the work: it finds the compiled Greeter contract and passes that string to the constructor as its initial argument. waitForDeployment() holds the script until the transaction is confirmed; without it the script can finish before the contract exists. The final console.log prints the permanent address.
Keep keys out of your code. Never hardcode a private key or an RPC URL in a script or a config file. Hardhat ships a keystore plugin for this:
npx hardhat keystore set SEPOLIA_PRIVATE_KEYandnpx hardhat keystore set SEPOLIA_RPC_URLstore the values in an encrypted vault that the config reads throughconfigVariable(). Use a key that only ever holds testnet funds.
Running the Deployment
With the script written and the network configured, one command deploys to Sepolia:
npx hardhat run scripts/deploy.ts --build-profile production --network sepolia
The production build profile compiles your contracts with optimization, which is what you want for anything you intend to keep. Hardhat connects to Sepolia, sends the transaction, waits for it to be included in a block, and prints the contract address to your terminal.
Taking It From Deployed To Verified
A deployed contract is not yet a readable one. For anyone to trust it, you verify its source code on a block explorer like Etherscan, which proves the code running on chain is the code you wrote.
Take the contract address from your terminal, open Sepolia Etherscan, and paste it into the search bar. The contract's page will carry a note that the code is not verified. Open the "Contract" tab and follow the "Verify and Publish" link.
You are asked for the exact compiler version, the optimizer settings, and the license you used, all of which are set in hardhat.config.ts, and then for the source itself. Etherscan compiles what you submit and compares the result with the bytecode on chain. If they match, the contract shows as verified.
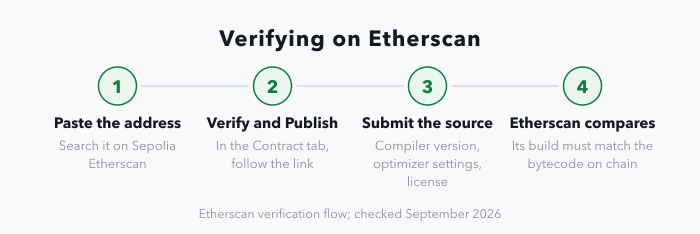
Most failed verifications are a settings mismatch: a different Solidity version, different optimizer settings, or constructor arguments that do not match what was passed at deployment. Check all three before submitting.
Why Transparency Is Everything
Verification is what lets a user read the code they are about to trust with funds, rather than taking your word for it. On an unverified contract there is nothing to read but bytecode.
Before a mainnet deployment, check the current gas price on a tracker such as Etherscan's gas tracker. The fee depends on the base fee at the moment your transaction is included, and that applies to every later interaction users have with the contract, not just the deployment.
Deploy-and-verify is core to the job. If you are looking to do it for a living, the board lists blockchain developer roles and what they pay.
Common Questions About Deployment
What does a deployment cost?
The fee is the gas used multiplied by the gas price. Gas used depends on the size of your contract and what its constructor does, and is roughly fixed for a given contract. The gas price moves with demand for block space, so the same deployment costs different amounts on different days. Check a gas tracker immediately before a mainnet deployment, and if the launch can wait, deploy when the network is quiet. On a testnet, none of it costs anything real.
What happens if a bug turns up after deployment?
Deployed code is immutable. You cannot edit it the way you would edit a web server, which is the point of the technology but does change how you plan.
The usual answer is a proxy pattern. Users interact with a small proxy contract that forwards every call to a separate logic contract. To fix a bug you deploy new logic and point the proxy at the new address, so the application keeps one stable address. The trade-off is real: whoever controls the proxy can change the rules, so who holds that control matters as much as the code does.
Why do deployments fail?
A failed deployment transaction usually has one of two causes.
- Insufficient gas: if the gas limit is too low the transaction fails, and the gas already spent is not returned. Check a gas tracker before deploying on mainnet.
- Node error: a free, public RPC endpoint can be overloaded and drop your transaction. Dedicated node providers like Alchemy or Infura exist for this reason.
Can the same contract go on Ethereum and Polygon?
Yes. Polygon, Avalanche, and BNB Chain are EVM-compatible, so the same Solidity and the same bytecode work on all of them.
The script barely changes. Add each network's RPC endpoint and chain ID to your Hardhat config and deploy with that network's name. Each deployment is separate, with its own address and its own state.
Find Web3 lists blockchain developer jobs at crypto, DeFi, and infrastructure companies.